

Article demonstrating the ease of cold-formed steel metal framing for a two storey house using ScotSteel with ease
ScotSteel is an advanced 3D software specialised in the creation of cold-formed steel framed models from architectural plans. A step-by step process to frame a two storey building using Scottsdale profiles is detailed below
Automated Cold-Formed Wall Framing: Boosting Construction Speed and Precision
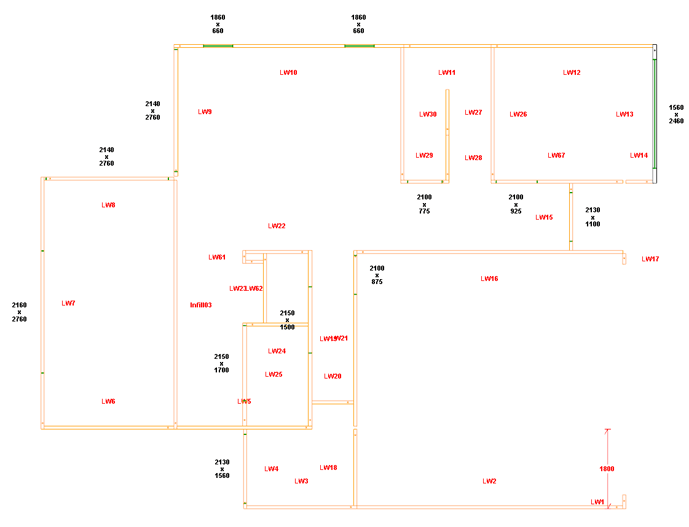
The first step in framing the building using ScotSteel is to set the desired sections that are to be intended for use within the building. This is achieved by selecting the appropriate sections and the required elevation heights within the wall and floor designer settings. Upon selection of the desired walls from the menu bar, walls are drawn as per the architectural plans in the plan view with corresponding dimension. Quick video describing this process is shown below.
 |
 |
| (a) Plan view of walls in ScotSteel | (b) Automatic walls extrusion in ScotSteel |
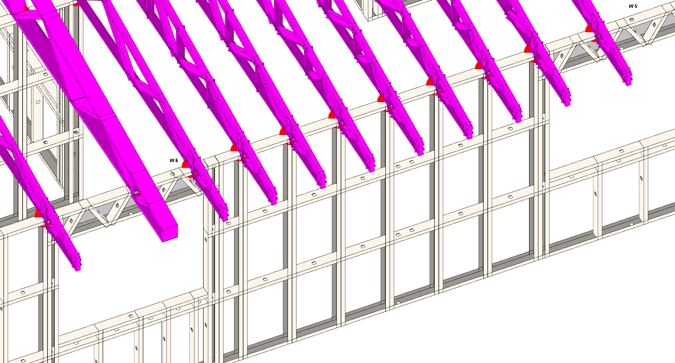
Efficient Lintel Header and Openings Creation: Trussed Lintels for Long Spans
Once the wall frames are created as per the architectural plans, the next step is to introduce openings within the walls and frame around them. This is an important step in the framing design process as the wall studs are subjected to carry predominantly axial loads from the trusses/panels rested on them with additional bending loads from wind. However, in case of lintels, bending forces govern and the lintel structure must be able to cater for it. ScotSteel automatically frames an in-line trussed header along the length of the opening and frames the required jamb studs around it which is explained in the attached video below.
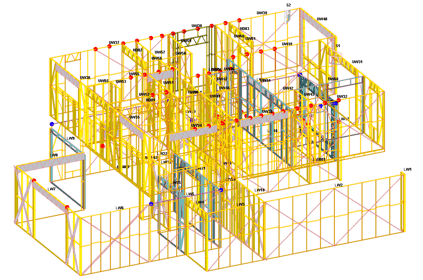
Cold-formed steel roof trusses and aligning with wall studs
The next step in the metal framing process is the generation of roof for the building. This is achieved by the auto roof tool from the menu bar within the roof designer tab. Both hip and gable end of the roof can be generated automatically with ease with the help of the roof designer tool. The required end where the roof plane is to be a gable OR a hip end can be specified through the wall properties dialogue box. The attached video details how quickly wall planes can be generated for a given roof plan and roof trusses added to the project rapidly. The roof designer also has the functionality for rapid editing of the roof trusses along with editing the position of the trusses within a roof hip set which is also detailed in the video.
Roof trusses aligned with wall studs
After completion of the roof planes and placing the roof truss and the required spacings, the walls studs can be automatically aligned to be positioned under the roof trusses for efficient load transfer. This can be executed rapidly with the help of auto-truss align tool which has also been explained in detail within the video.
Framing the upper storey and adding floor joists
A portion of the building must be framed on the upper storey as well, where wall frames are to be added to the desired locations on top of the lower storey wall frames. This is done by appending the desired wall levels and required heights within the wall designer tool and letting ScotSteel to frame it automatically. Once the walls of the upper storey are in place, floor joists using the in-line C-section profiles, or the stronger Top hat profile can be added with ease using the floor designer tab. The floor designer works in a similar manner to that of the roof designer where a floor plane is created first followed by position of the floor trusses in the desired spacing using the floor properties window. This can be adjusted at any point during the design and detailing process. Attached video explains the framing of the second storey wall along with the floor joists in detail.
Framing second-storey roof and finalising the design
In a similar process as adopted in creating the first storey roof, the second-storey roof is framed by creating the roof plane for the desired shape using the auto-roof tool in the roof designer tab. Please ensure the appropriate level is selected for framing the roof for the second storey. Once the roof plane is finalised, roof trusses are added using the steps explained before in this article and the studs of the upper storey wall are aligned with the roof trusses thereby resulting in efficient load transfer path within the cold-formed steel frames. Attached video explains the same in detail.
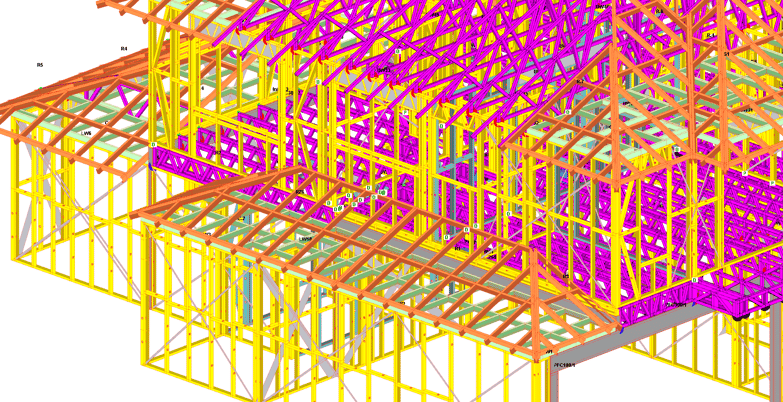
Fully framed double storey building
Summary of cold-formed steel framing using ScotSteel
Rapid cold-formed steel framing any given architectural plan can be achieved by the intelligent ScotSteel software from Scottsdale. All rapid framing tools have been thoughtfully developed using decades of cold-formed steel framing experience by in-house detailers and software development team to cater for all the pressing needs in projects of any complexity.
Click here – To know more about how our bespoke cold-formed steel framing software can help your steel framing business to frame up your next project.


